Quick answer
To enable XMP or EXPO, restart your computer and enter the BIOS or UEFI setup. Find the memory profile setting, choose an available XMP or EXPO profile, then save your changes. Once Windows starts, confirm the reported memory speed and test the system for stability.
Without a memory profile enabled, many DDR4 and DDR5 kits run at a conservative default speed instead of the advertised speed shown on the package. A DDR5-6000 kit, for example, may initially operate at DDR5-4800 or DDR5-5200.
Enabling a profile applies predefined frequency, timing, and voltage values stored on the memory modules. It’s usually a one-setting change, though the final speed still depends on the motherboard, processor, BIOS version, and memory configuration.
Keep in mind: XMP and EXPO are forms of memory overclocking. Most compatible systems handle them without trouble, but no profile is guaranteed to be stable with every processor and motherboard combination. Record the original BIOS setting before making changes.
What XMP and EXPO do
Intel Extreme Memory Profile, or XMP, stores tested performance settings on compatible RAM. AMD Extended Profiles for Overclocking, known as EXPO, serves a similar purpose and is commonly associated with AMD DDR5 platforms.
The profile name doesn’t always limit it to one processor brand. Some AMD motherboards can load XMP memory, while certain modules or boards may show more than one profile format. Choose the profile type your motherboard recognizes rather than relying only on the CPU brand.
Before you enable a memory profile
- Confirm compatibility: Check the motherboard specifications for XMP or EXPO support and the memory speeds it supports.
- Install the RAM in the recommended slots: With two modules on a four-slot board, the correct positions are commonly the second and fourth slots from the CPU, often labeled A2 and B2. Check the motherboard manual to be sure.
- Update the BIOS if needed: A newer stable BIOS can improve DDR5 training and memory compatibility. Follow the board manufacturer’s update instructions carefully.
- Know how to reset the BIOS: Before changing memory settings, find the Clear CMOS button, jumper, or battery procedure in the motherboard manual.
Laptops and many prebuilt desktops use locked firmware, so they may not provide XMP or EXPO controls even if the installed RAM contains a profile.
How to enable XMP or EXPO in the BIOS
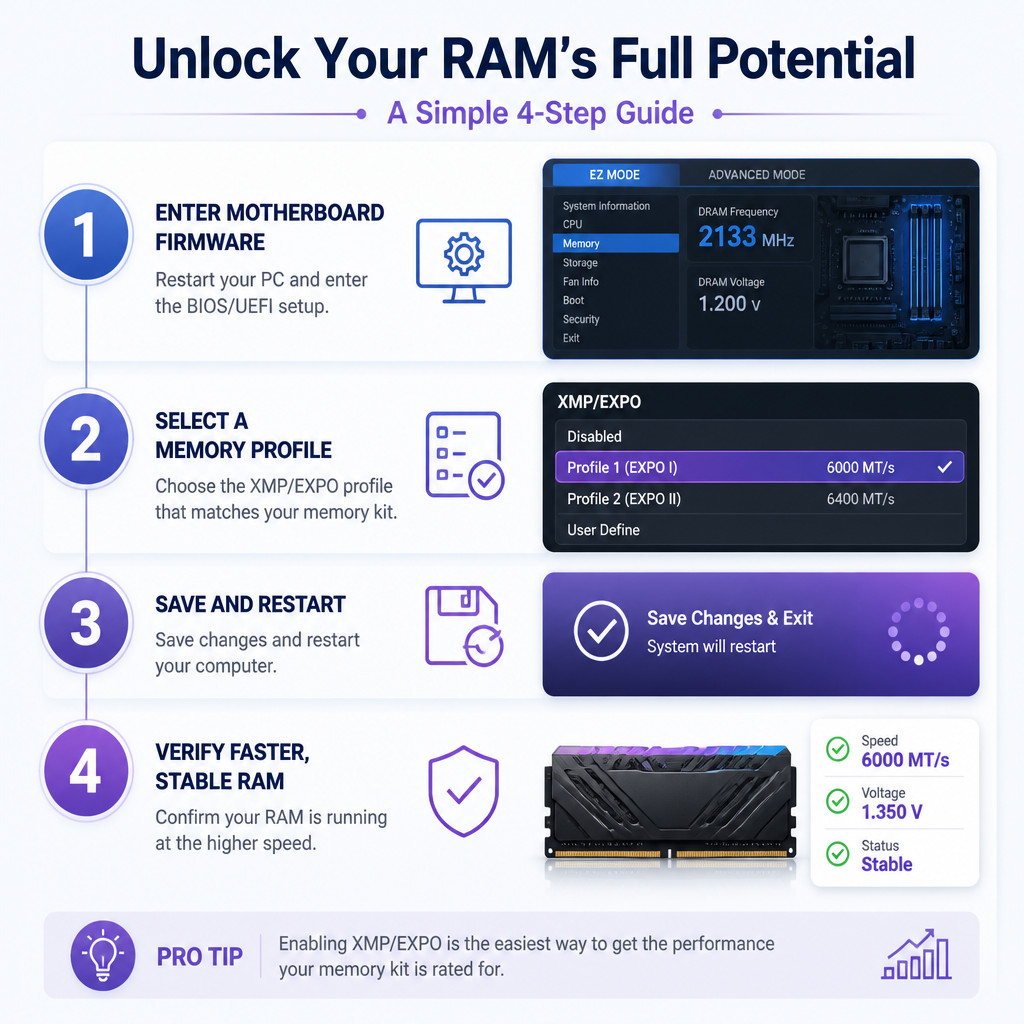
- Restart the computer and enter the BIOS. Press the setup key repeatedly while the computer starts. Common keys include Delete, F2, F10, and Esc. The correct key usually appears briefly on the startup screen or is listed in the system manual.
- Switch to advanced mode if necessary. Some firmware shows memory profiles on the main page. Other systems place them in an overclocking, performance, memory, tweaking, or advanced settings menu.
- Locate the memory profile control. Look for a setting called XMP, EXPO, A-XMP, Load XMP Setting, Memory Profile, DRAM Profile, or Ai Overclock Tuner. The exact wording varies by manufacturer and BIOS version.
- Choose the primary profile. Start with Profile 1, XMP I, EXPO I, or the equivalent default profile. If you see several options, compare their listed frequency and timings with your memory kit’s specifications.
- Save the settings and restart. Select Save and Exit, which is commonly assigned to F10. Review the change summary before confirming.
- Let memory training finish. The first DDR5 boot after a profile change can take longer than usual and may involve several automatic restarts. Don’t interrupt the process unless the system remains unresponsive well beyond the behavior described by the motherboard manufacturer.
Common BIOS setting names
Motherboard interfaces differ between models, but these labels can help you find the right option:
- ASUS: Ai Overclock Tuner, XMP I, XMP II, EXPO I, or EXPO II
- MSI: A-XMP, XMP, or EXPO
- Gigabyte: Extreme Memory Profile, XMP, or EXPO
- ASRock: Load XMP Setting or DRAM Profile Configuration
Don’t manually adjust memory voltage or timings unless you understand the platform’s safe limits. A supported profile already provides the values intended by the memory vendor.
How to check RAM speed in Windows
- Press Ctrl + Shift + Esc to open Task Manager.
- Choose Performance, then select Memory.
- Check the displayed speed and compare it with the profile you selected.
Current Windows versions generally show the effective transfer rate in MT/s, although some interfaces and utilities may label the figure as MHz. Software that reports the physical DRAM clock can display roughly half the marketed DDR rate. For instance, a DDR4-3200 setup may appear close to 1600 MHz because double data rate memory transfers data twice during each clock cycle.
Checking the displayed speed isn’t enough. You should also test stability by using the computer normally and running a reputable memory diagnostic or sustained workload. Unexpected restarts, application crashes, corrupted archives, blue screens, or reported memory errors suggest that the configuration may be unstable.
What to do if the computer won’t boot
- Wait several minutes, as the motherboard may still be performing memory training.
- If the system remains stuck, turn off the computer and disconnect the power.
- Use the motherboard’s Safe Boot, Retry, or Clear CMOS feature by following the instructions in its manual.
- Return to the BIOS and load optimized defaults.
- Try a slower available memory profile, if there is one, or leave XMP or EXPO disabled.
If the system boots but produces errors, update the BIOS and make sure the modules are installed as a matched kit in the correct slots. Four modules put more load on the processor’s memory controller than two, which can make the advertised profile speed harder to reach when every slot is populated.
Common mistakes to avoid
- Mixing separate memory kits: Matching model numbers don’t guarantee that independently packaged kits will work together at their rated profile.
- Assuming the advertised speed is automatic: Performance profiles are often disabled by default.
- Overlooking CPU and motherboard limits: A RAM kit’s profile can’t override the capabilities of the memory controller or motherboard.
- Changing several settings at once: Enable the profile by itself first, making any instability easier to diagnose.
- Skipping stability tests: A successful boot doesn’t prove the memory will remain error-free under load.
Frequently asked questions
Should I enable XMP or EXPO?
Enable it if the motherboard supports the profile, the memory kit is designed for it, and you want the RAM to run at its rated performance settings. Keep it disabled if stability matters more than extra memory performance or if the system starts producing errors.
Can enabling XMP or EXPO damage RAM?
A profile uses stored settings intended for that memory kit, but those settings still operate outside standard defaults and may increase voltage or heat. Stick to profiles supported by your hardware, and don’t add manual voltage unless you understand the risks.
Why is XMP or EXPO missing from my BIOS?
Your motherboard may not support memory profiles, the firmware might hide advanced controls, or the installed RAM may not contain a compatible profile. Locked laptops and prebuilt systems commonly leave out the option.
Why does my RAM still show the wrong speed?
The profile may not have been saved, or the system could have reverted to its previous settings after failed memory training. The reporting tool may also be showing the physical clock rather than the effective DDR rate. Check the BIOS profile again, then compare the value in Task Manager or another hardware information utility.