
A laptop docking station can connect two monitors, wired Ethernet, USB accessories, audio devices, and power through a single cable. Before plugging everything in, make sure the dock’s display technology, charging output, and monitor limits match your laptop. The presence of a USB-C connector doesn’t automatically mean the laptop supports video output or receives enough power for charging.
Quick setup steps
- Find out how your laptop sends video through USB-C or Thunderbolt.
- Confirm that the laptop supports the number of monitors, resolutions, and refresh rates you plan to use.
- Connect the docking station to its power adapter.
- Plug each monitor directly into a separate video output on the dock.
- Connect Ethernet, a keyboard, mouse, storage, and any other USB accessories.
- Use the supplied host cable to connect the dock to the laptop.
- Install dock drivers or DisplayLink software if they’re required.
- Set the display arrangement, resolution, and refresh rate in your operating system.
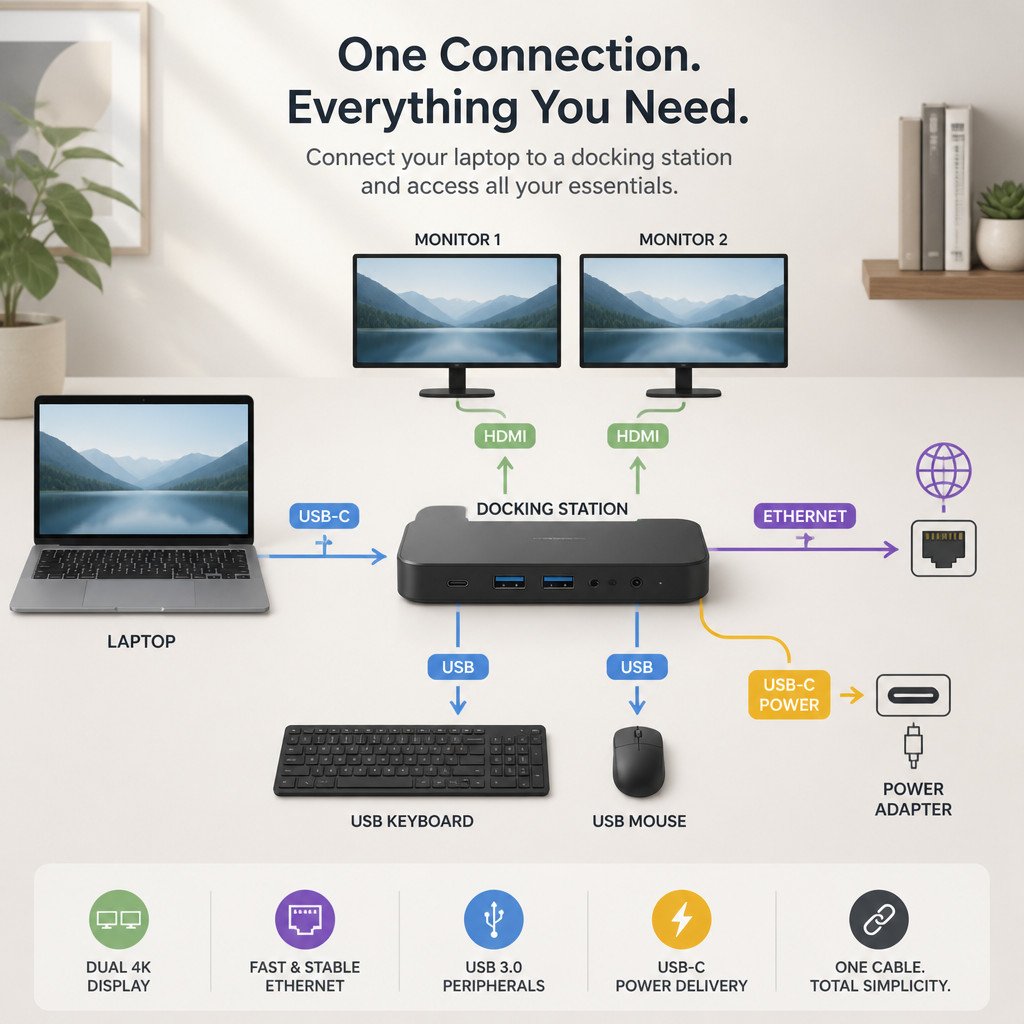
If charging or video isn’t working, try the original USB-C or Thunderbolt cable that came with the dock. A standard charging cable may not support the data bandwidth or video signal the docking station needs.
What to check before connecting the dock
| Feature | What to verify |
|---|---|
| Host connection | USB-C with DisplayPort Alt Mode, USB4, Thunderbolt, or DisplayLink support |
| Monitor support | Maximum display count, resolution, and refresh rate supported by both the laptop and dock |
| Charging | Enough dock power delivery to meet the laptop’s recommended wattage |
| Video ports | HDMI or DisplayPort outputs that match the monitors’ inputs |
| Operating system | Support for your version of Windows, macOS, or Linux from the dock and its display technology |
| Host cable | A full-featured cable rated for the dock’s USB, USB4, or Thunderbolt standard |
Differences between USB-C, Thunderbolt, and DisplayLink
A USB-C dock may rely on DisplayPort Alt Mode, which carries a native video signal from the laptop’s graphics hardware. With a compatible Windows laptop, the dock can split that signal across multiple displays using Multi-Stream Transport, usually called MST.
Thunderbolt and USB4 docks provide more bandwidth and may handle higher resolutions or more displays. Even so, the laptop’s graphics hardware sets the final display limit.
DisplayLink docks generate video through USB data and need DisplayLink software. They can add monitors to computers with limited native display support, though they use processor resources and may not be the best choice for competitive gaming or color-critical work.
macOS generally can’t use DisplayPort MST to extend separate desktops through a standard MST dock. Depending on the Mac model, alternatives may include a supported Thunderbolt dock, direct monitor connections to separate ports, or a DisplayLink dock. Display limits on Apple silicon vary by chip, model, and whether the laptop lid is open, so check the specifications for your exact Mac.
How to set up a laptop docking station
1. Position the dock and connect power
Put the dock somewhere its host cable can reach the laptop without being stretched. Connect the dock’s power supply before attaching monitors or USB devices. Powered docks tend to work more reliably with external drives, webcams, and other accessories that draw power.
2. Connect both monitors
Plug one monitor into each supported HDMI or DisplayPort output. It’s best to avoid adapters during the initial setup because they add another possible compatibility issue. Then use each monitor’s controls to select the correct input source.
High-resolution and high-refresh-rate displays need cables rated for the required HDMI or DisplayPort version. A dock might support two 4K monitors only at a specific refresh rate or only when its other display outputs aren’t being used.
3. Attach Ethernet and USB accessories
Connect the network cable to the dock’s Ethernet port. You can then plug in the keyboard, mouse, webcam, headset, printer, storage devices, and other accessories. If the ports are labeled by speed, reserve the faster USB ports for external SSDs and use slower ones for devices such as keyboards and mice.
4. Connect the dock to your laptop
Use the host cable supplied with the dock. Plug it into a USB-C, USB4, or Thunderbolt port that supports the functions you need. Some laptops have several USB-C ports, but video output or charging may work through only certain ones.
5. Install drivers or dock software
Native USB-C and Thunderbolt docks often work without separate display drivers. However, Ethernet, audio, firmware, or security functions may still need software from the manufacturer. DisplayLink docks require the correct DisplayLink package. On macOS, you may also have to grant screen-recording permission, since that permission lets the software create output on an external display.
6. Arrange the displays
In Windows, go to Settings, System, and Display. Select Extend these displays, move the monitor rectangles so they match the physical layout on your desk, and choose the preferred resolution and refresh rate for each screen.
In macOS, open System Settings and select Displays. Check that each monitor extends the desktop instead of mirroring it. Then arrange the display positions and choose appropriate resolutions.
How to check charging and Ethernet
Look at the laptop’s battery icon and confirm that it shows a power connection. Keep in mind that a dock advertised with 100-watt input may not send the full 100 watts to the laptop. The dock can reserve some power for its own operation and for connected accessories. Compare its actual host power output with the wattage listed for the laptop’s original charger.
To test Ethernet, temporarily turn off Wi-Fi and try opening a website or connecting to a local network resource. Most dock Ethernet ports have link or activity lights, though some models don’t include them.
Common docking station problems
| Problem | Likely fix |
|---|---|
| Only one monitor works | Check the laptop’s display limits, macOS MST restrictions, cable specifications, and whether DisplayLink software is needed. |
| Displays are duplicated | Choose Extend rather than Duplicate or Mirror in the display settings. |
| Laptop does not charge | Use the correct host port and cable, then confirm that the dock supplies enough USB Power Delivery wattage. |
| Monitor flickers or disconnects | Lower the refresh rate, replace the video or host cable, update the dock firmware, and remove adapters that aren’t necessary. |
| Ethernet is missing | Install the dock’s network driver, reconnect the Ethernet cable, or try another port on the router or switch. |
| USB devices disconnect | Connect the dock’s power adapter and move high-bandwidth devices to separate ports when possible. |
Docking station setup best practices
- Use the supplied host cable rather than a phone charging cable.
- Keep the docking station firmware and laptop graphics drivers up to date.
- Use short, certified video cables for high-resolution monitors.
- Stay within the dock’s published display bandwidth and power budget.
- Leave room around the dock for ventilation instead of covering it with papers or fabric.
- Safely disconnect external storage before unplugging the laptop.
Frequently asked questions
Can any USB-C laptop use a docking station?
No. Basic USB accessories and Ethernet may work, but native monitor output requires USB-C DisplayPort Alt Mode, USB4, or Thunderbolt. A DisplayLink dock can carry video through standard USB data when its driver and the operating system are supported.
Why does my dock support two monitors but my laptop does not?
The dock’s specifications show its maximum capability, not what it can guarantee with every computer. Lower limits may come from the laptop’s graphics hardware, USB-C implementation, operating system, or supported display count.
Can one USB-C cable run dual monitors and charge the laptop?
Yes, as long as the laptop, docking station, and cable support the required video bandwidth and USB Power Delivery. The dock also needs to provide enough charging wattage for the laptop.
Should I connect monitors to the dock or directly to the laptop?
Connecting the monitors to the dock gives you a cleaner one-cable setup. A direct connection to the laptop may work better if the dock doesn’t have enough bandwidth, the computer lacks MST support, or a high-refresh-rate monitor needs a dedicated video output.
