
A KVM switch allows two computers to use the same monitor, keyboard, and mouse. That’s handy when a work laptop and personal desktop share one desk, and you’d rather avoid duplicate peripherals or swap cables all day.
The Short Version
Connect each computer’s video output and USB data connection to the matching inputs on the KVM switch. Next, plug the monitor, keyboard, and mouse into the KVM’s output ports. Power everything on, then switch computers with the hardware button, remote control, or keyboard shortcut.
Check the connections before buying cables. Your KVM may use HDMI, DisplayPort, or USB-C, and every switch and cable in the chain must support the resolution and refresh rate you want. A 4K monitor running at 60 Hz, for example, needs a KVM and video cables rated for 4K at 60 Hz or better.
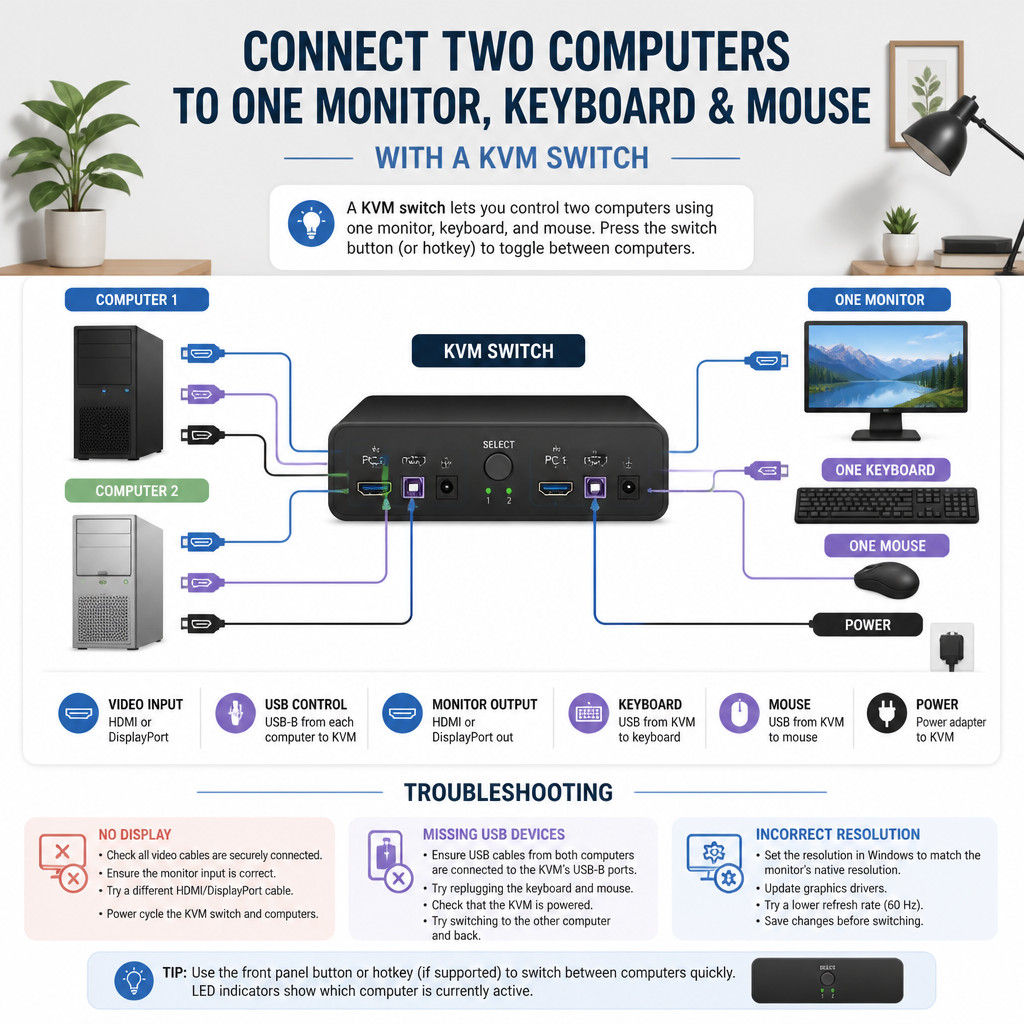
What You’ll Need
- A two-port KVM switch with the right video connection
- One monitor, keyboard, and mouse
- Two computers with compatible video outputs
- One video cable running from each computer to the KVM
- One USB data cable from each computer to the KVM, unless USB data travels over USB-C
- One video cable connecting the KVM to the monitor
- The KVM power adapter, if that model needs external power
Picking the Right KVM Switch
Matching connector shapes aren’t enough. Before installation, check the supported resolution and refresh rate, along with the USB version and number of monitors the switch can handle.
| Requirement | What to check |
|---|---|
| 1080p office monitor | An HDMI or DisplayPort KVM supporting at least 1920 × 1080 at 60 Hz |
| 4K monitor | Explicit support for 3840 × 2160 at the refresh rate you intend to use |
| High-refresh gaming monitor | DisplayPort or a suitable HDMI version with matching bandwidth |
| Laptop charging | A USB-C KVM offering enough Power Delivery wattage for the laptop |
| Webcam or external drive | A USB 3.x peripheral port, rather than USB 2.0 keyboard and mouse ports alone |
| Two monitors | A dual-monitor KVM and two video outputs from each computer |
One catch: A basic USB-C port can carry data without carrying video. If you want a single-cable laptop connection, the laptop’s port must support DisplayPort Alt Mode or another video-capable USB-C standard.
Setting Up a KVM Switch for Two Computers
1. Turn Off or Disconnect the Equipment
Shut down both computers and turn off the monitor. Modern connections don’t always require this, but it makes the cables easier to identify and may prevent a failed display handshake during the initial setup.
2. Connect the Monitor to the KVM Output
Run an HDMI or DisplayPort cable from the KVM port marked Output, Console, or Monitor to the monitor’s input. Then choose that input using the monitor’s physical controls.
3. Plug In the Keyboard and Mouse
Connect the keyboard and mouse to the KVM’s console USB ports. If there are dedicated ports for each device, use them. Some keyboard shortcuts work only when the keyboard is plugged into its designated port.
4. Hook Up the First Computer
Connect Computer 1’s video output to the first video input on the KVM. After that, run the matching USB upstream cable from Computer 1 to the USB input assigned to the same channel.
That USB cable matters. It carries the keyboard and mouse input, so a video connection by itself may show the computer on-screen but won’t let the shared keyboard or mouse control it.
5. Hook Up the Second Computer
Repeat the same process with the second set of KVM inputs. Keep the video and USB connections together on channel 2. Mix those channels up and the screen could switch to one computer while the keyboard and mouse control the other.
6. Add Power and Start Both Computers
Connect the KVM’s power adapter if the unit requires one. Turn on the monitor, select Computer 1 on the KVM, and start that computer. Once you’ve confirmed that its display and USB devices work, start Computer 2 and change channels.
7. Adjust Each Computer’s Display Settings
Set the proper resolution and refresh rate separately on both computers. In Windows, go to Settings > System > Display > Advanced display. On macOS, open System Settings > Displays.
Switching Between the Computers
How you switch depends on the KVM model. You’ll generally have one or more of these options:
- Physical button: Press the button on the KVM enclosure.
- Wired remote: Keep the small remote button within reach while hiding the KVM under the desk.
- Keyboard shortcut: Use the documented hotkey sequence, which often involves Scroll Lock.
- Automatic switching: Some KVMs choose an active input after detecting a powered computer.
If the keyboard shortcut doesn’t respond, move the keyboard to the dedicated console port. Temporarily disabling any keyboard software that remaps keys may help too.
KVM Problems and Their Fixes
| Problem | Recommended fix |
|---|---|
| No display | Check the monitor input, reseat the video cables, select the right KVM channel, and test the display at 60 Hz. |
| Keyboard or mouse not working | Check the selected computer’s USB upstream cable and use the dedicated console ports. |
| Screen flashes after switching | Try shorter certified cables, then lower the refresh rate to check for a bandwidth limitation. |
| Windows rearranges open windows | Use a KVM with EDID emulation so each computer keeps detecting the monitor while inactive. |
| USB-C laptop has no video | Confirm that the laptop’s USB-C port supports video output and that the cable can carry video. |
| Webcam disconnects | Plug it into a USB 3.x peripheral port or use a powered USB hub supported by the KVM. |
Setup Mistakes to Avoid
- Running the video cables but forgetting the USB upstream cables
- Pairing the video connection for channel 1 with the USB connection for channel 2
- Assuming every USB-C cable carries video and charging power
- Using a KVM rated for 4K at 30 Hz when the monitor is expected to run at 4K at 60 Hz
- Plugging a high-bandwidth webcam or storage drive into a USB 2.0 console port
- Buying a single-monitor KVM for a workspace with two monitors
Keeping the Setup Reliable
- Label both ends of every cable by computer and channel.
- Stick with short, certified video cables where possible.
- Leave the KVM within reach until you’ve tested every connection.
- Choose EDID emulation if you want open windows to stay in place.
- Use a separately powered KVM when several USB peripherals are being shared.
- Confirm that the KVM passes audio if sound needs to follow the selected computer.
Testing the Finished Installation
- Select Computer 1, then check the video, keyboard, mouse, audio, and any shared USB devices.
- Switch to Computer 2 and run the same checks.
- Change back and forth several times to make sure the display reconnects consistently.
- Restart each computer while it isn’t the selected channel. This confirms that startup display detection works.
- Check the resolution and refresh rate on both systems.
With the right KVM and matching cables, the full workspace should switch in a few seconds. No cable reconnection, and no manual change to the monitor input.
