Cisco packet tracer allows us to create, test and simulate virtual network configurations. Simmilarly in this article we will see how to configure and test DHCP (Dynamic Host Configuration Protocol) in cisco packet tracer environment.
To simulate DHCP in a cisco packet tracer you will need a virtual LAN setup as shown in the following image, this LAN will contain
- 2811 Router – 1 Nos
- 2950T Switch – 1 Nos
- PCs as Endpoint – 4 Nos

Connect all mentioned devices with copper straight through cable or use the auto select option. Remember to connect the router interface FastEthernet0/0 to the FastEthernet0/0 interface of a switch.
Steps to configure DHCP in cisco packet tracer router
In Cisco Packet Tracer, you can configure DHCP on a router by following these steps:
- Open Cisco Packet Tracer and select the router you want to configure as DHCP server.
- Right-click on the router and select “CLI” or “Command Line Interface” to open the router’s command-line interface.
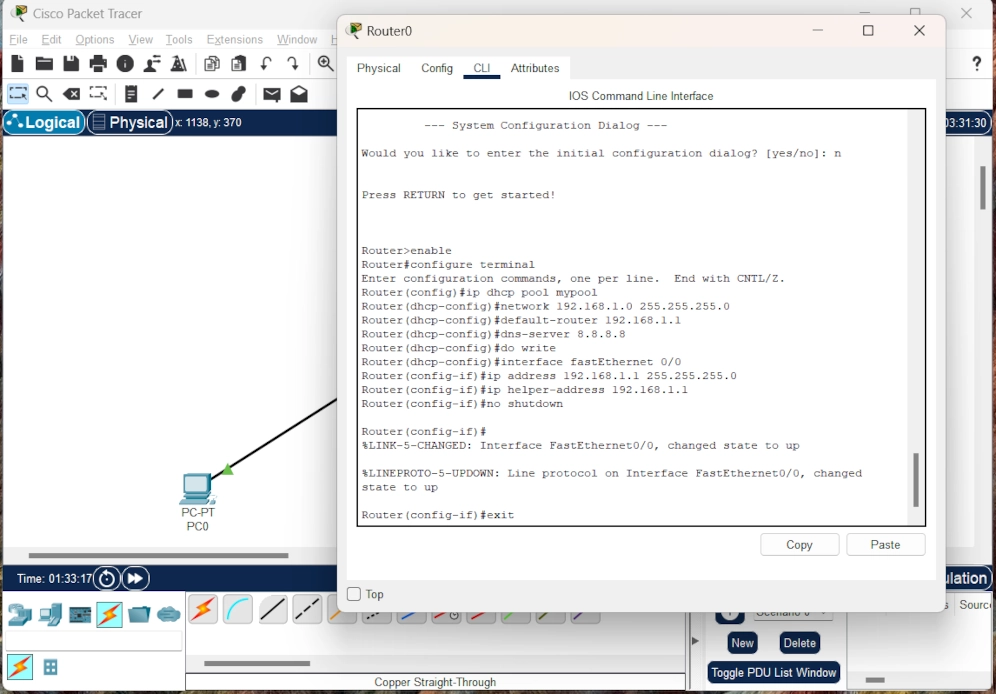
- Type “
enable” to enter privileged mode, and then type “configure terminal” to enter global configuration mode. - Type “ip dhcp pool <pool_name>” to create a DHCP pool and give it a name. Example: “
ip dhcp pool mypool“ - Type “network <network_address> <subnet_mask>” to define the network for which the DHCP server will assign IP addresses. Example: “
network 192.168.1.0 255.255.255.0“ - Type “default-router <router_ip_address>” to specify the default gateway IP address for the DHCP clients. Example: “
default-router 192.168.1.1“ - Type “dns-server <dns_ip_address>” to specify the DNS server IP address for the DHCP clients. Example: “
dns-server 8.8.8.8“ - Type “exit” to exit DHCP pool configuration mode and return to global configuration mode.
- Type “interface <interface_name>” and press enter. Example: “
interface fastEthernet 0/0“ - Type “ip address <ip_address> <subnet_mask>” to assign an IP address and subnet mask to the interface. Example: “
ip address 192.168.1.1 255.255.255.0“ - Execute “
no shutdown” command to keep the interface 0/0 link alive, this will make link point color green - Type “ip helper-address <dhcp_server_ip>” to enable the DHCP relay on the interface. Example: “
ip helper-address 192.168.1.1“ - Type “
exit” to return to global configuration mode, and then type “do write” to save the changes.
You can observe all above commands executed on Router0 as shown in following screenshot.

Note: This is just a basic example of configuring DHCP on a router in Cisco Packet Tracer. The actual commands and configurations may vary depending on the specific router model and network requirements.
Enable DHCP IP configuration in endpoint PCs
- Now double-click on PC0 to open its configuration.
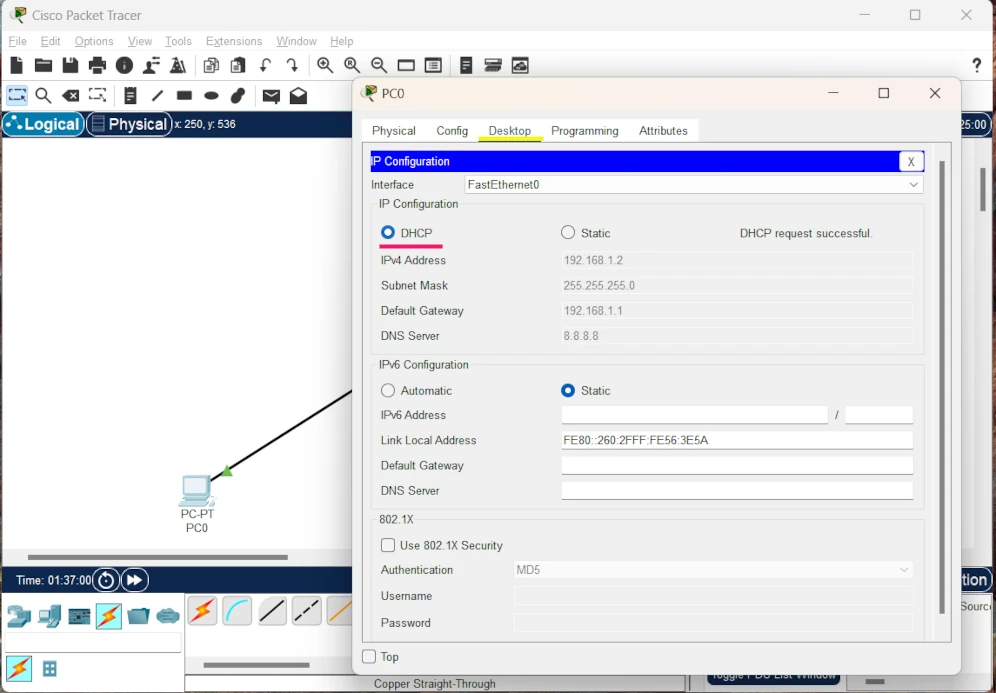
- Now select “IP Configuration” under the Desktop tab of PC0
- Check on the DHCP radio option to enable DHCP auto-configuration
- Wait for a few seconds, the PC IP address will get automatically configured. here it is 192.168.1.2 as shown in the following screenshot.
- Repeat the process for each endpoint PC (ie. PC1 to PC4)

