Quick answer: To set up WireGuard split tunneling, include only the networks that should travel through the VPN in the client peer’s AllowedIPs setting. For instance, AllowedIPs = 10.20.0.1/32, 192.168.50.0/24 routes traffic for the WireGuard server and the remote private LAN through the tunnel. Web browsing and other internet traffic continue to use the client’s normal connection.
Don’t use 0.0.0.0/0 unless you want a full-tunnel VPN. WireGuard routes IP addresses and CIDR networks, not application names or domain names.
How split tunneling works in WireGuard
On a WireGuard client, AllowedIPs serves two related purposes. It identifies which addresses are accepted from a peer, and it tells the client which destinations should be routed to that peer. A narrow list produces a split tunnel, while default routes create a full tunnel.
- Private-network split tunnel:
192.168.50.0/24 - One specific host:
192.168.50.25/32 - All IPv4 traffic:
0.0.0.0/0 - All IPv6 traffic:
::/0
A private-network split tunnel is the most common arrangement. Remote users can reach office servers, a NAS, or a home network without routing unrelated internet traffic through the VPN server.
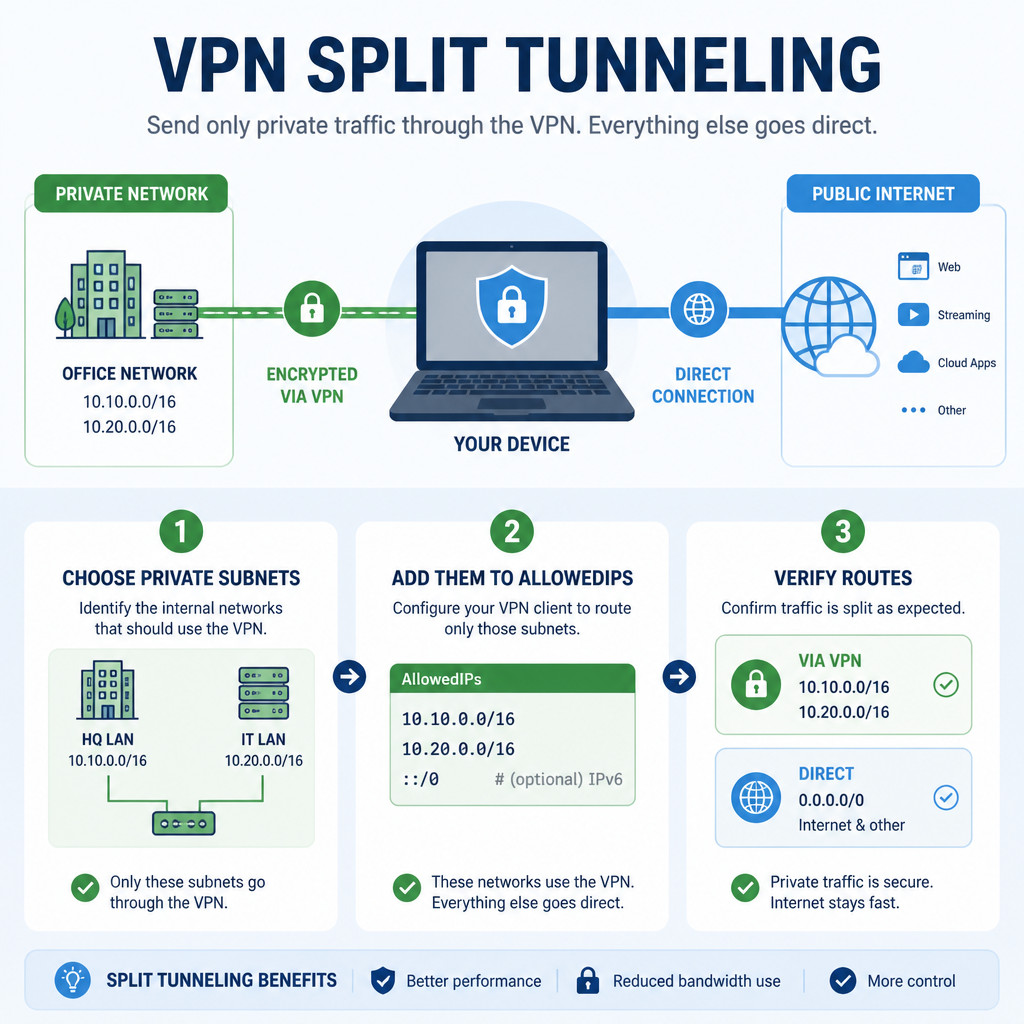
Example network layout
This example uses the following addresses:
- WireGuard server tunnel address:
10.20.0.1 - WireGuard client tunnel address:
10.20.0.2 - Remote private LAN:
192.168.50.0/24 - Internal DNS server, if required:
192.168.50.10 - WireGuard UDP port:
51820
Replace the example addresses, keys, and endpoint with the correct values for your network.
Configure the WireGuard client
- Open the tunnel configuration in your WireGuard client, or edit the configuration file directly.
- Locate the server’s
[Peer]section. - Set
AllowedIPsto the WireGuard server address and every remote network that should use the tunnel. - Save the configuration, then reactivate the tunnel.
[Interface]
PrivateKey = CLIENT_PRIVATE_KEY
Address = 10.20.0.2/32

[Peer]
PublicKey = SERVER_PUBLIC_KEY
Endpoint = vpn.example.com:51820
AllowedIPs = 10.20.0.1/32, 192.168.50.0/24
PersistentKeepalive = 25
With this configuration, traffic destined for 10.20.0.1 or anywhere on the 192.168.50.0/24 LAN goes through WireGuard. Every other destination continues to use the client’s existing default gateway.
PersistentKeepalive = 25 can help when the client sits behind NAT or a stateful firewall. It doesn’t enable split tunneling.
Check the server peer settings
The server also needs a peer entry that links the client’s tunnel address to its public key:
[Interface]
PrivateKey = SERVER_PRIVATE_KEY
Address = 10.20.0.1/24
ListenPort = 51820

[Peer]
PublicKey = CLIENT_PUBLIC_KEY
AllowedIPs = 10.20.0.2/32
Don’t copy the client’s remote-LAN routes into this server peer entry. On the server, a peer’s AllowedIPs normally lists addresses located behind that client. For a regular roaming client, this is usually just its tunnel IP.
Allow access to the remote LAN
A successful WireGuard handshake doesn’t necessarily mean the client can reach devices behind the server. The server must forward packets between its WireGuard interface and LAN interface, and its firewall must allow that traffic.
The remote LAN also needs a return path to 10.20.0.0/24. There are two common ways to provide one:
- Add a route to the LAN router that sends
10.20.0.0/24to the WireGuard server’s LAN address. - Configure source NAT or masquerading on the WireGuard server so LAN devices see the connections as coming from the server.
A static return route keeps each VPN client’s original address visible and is generally the better choice when the router supports it. NAT is often simpler on networks where you can’t change the main router.
Set DNS only if it’s needed
If internal hostnames depend on a private DNS server, add that server to the client interface:
[Interface]
PrivateKey = CLIENT_PRIVATE_KEY
Address = 10.20.0.2/32
DNS = 192.168.50.10
DNS handling differs across operating systems and WireGuard clients. Setting a private DNS server may cause all DNS queries to go to that server, rather than only requests for internal domains. True split DNS may need operating-system resolver rules. If you connect to resources by IP address, or public DNS already resolves them properly, leave the DNS line unset.
Route selected internet destinations through WireGuard
Specific public IP ranges can also be sent through the tunnel by adding their CIDR blocks:
AllowedIPs = 10.20.0.1/32, 192.168.50.0/24, 203.0.113.0/24You can’t put a domain such as service.example.com directly in AllowedIPs. WireGuard requires IP addresses, and those addresses may change when a service uses a CDN, load balancer, or multiple regions. Application-based split tunneling also falls outside WireGuard’s basic configuration. It requires operating-system policy routing or a VPN application that supports the feature.
Verify the split tunnel
- Check your public IP address before turning on WireGuard.
- Activate the tunnel and check the public IP again. In this private-network split-tunnel setup, it should remain unchanged.
- Connect to an internal server or open a service on
192.168.50.0/24. - Check that WireGuard shows a recent handshake and increasing transfer counters.
- If traffic takes the wrong path, inspect the operating system’s route table.
Useful commands for checking routes and WireGuard status include:
Windows: route print
Linux:   ip route
macOS:   netstat -rn
WireGuard status: wg show
If ping doesn’t work, try the service you actually need. Many hosts block ICMP while still allowing HTTPS, SSH, file sharing, or another required protocol.
Common configuration mistakes
- Using a default route:
0.0.0.0/0sends all IPv4 traffic through WireGuard instead of creating a private-network split tunnel. - Forgetting IPv6: A full-tunnel configuration containing only
0.0.0.0/0doesn’t cover IPv6. Add::/0if IPv6 should also pass through the VPN. - Overlapping networks: Connectivity can fail when the local and remote networks use the same subnet, such as
192.168.1.0/24. - Missing forwarding: The tunnel may connect even though the server still won’t route packets to its LAN.
- Missing return route: Internal devices may receive requests but have no route for returning traffic to the WireGuard subnet.
- Overly broad AllowedIPs: Choose the smallest practical networks so unrelated traffic isn’t routed through the tunnel by mistake.
Frequently asked questions
What belongs in AllowedIPs for WireGuard split tunneling?
Include only the IP addresses and CIDR networks that need to use the VPN. For access to a remote LAN, this usually means the server’s tunnel IP and the remote LAN subnet.
Can WireGuard split tunnel by application?
Not with AllowedIPs alone. WireGuard routes traffic according to destination addresses. Per-application routing needs policy-routing features from the operating system or a third-party VPN client.
Why does WireGuard connect while the remote network stays unreachable?
Check the server’s IP forwarding and firewall rules, the remote LAN’s return route, and any overlapping local subnets. A recent handshake confirms that the peers can communicate, but it doesn’t prove the LAN routing is set up correctly.
How can I switch to a full tunnel?
Set the client peer to AllowedIPs = 0.0.0.0/0, ::/0. The server must then forward the client’s internet traffic and will usually need to NAT it. Before relying on the tunnel for all traffic, confirm that DNS and IPv6 are handled correctly.