Clipboard History in Windows 11 lets you retrieve more than the one item held by the ordinary clipboard. Press Windows key + V to open a panel of recently copied content, then select an earlier item to paste it. It is useful for links, commands, addresses, and template replies, but it also means copied information can remain available after you no longer need it.
For most people, the safe default is simple: use Clipboard History for routine, disposable snippets; pin only reusable text that is not sensitive; and keep cross-device sync off unless there is a clear reason to use it. A password manager, recovery code, banking detail, private customer information, or confidential work text should not be treated like a reusable clipboard snippet.
Turn on Clipboard History and use it
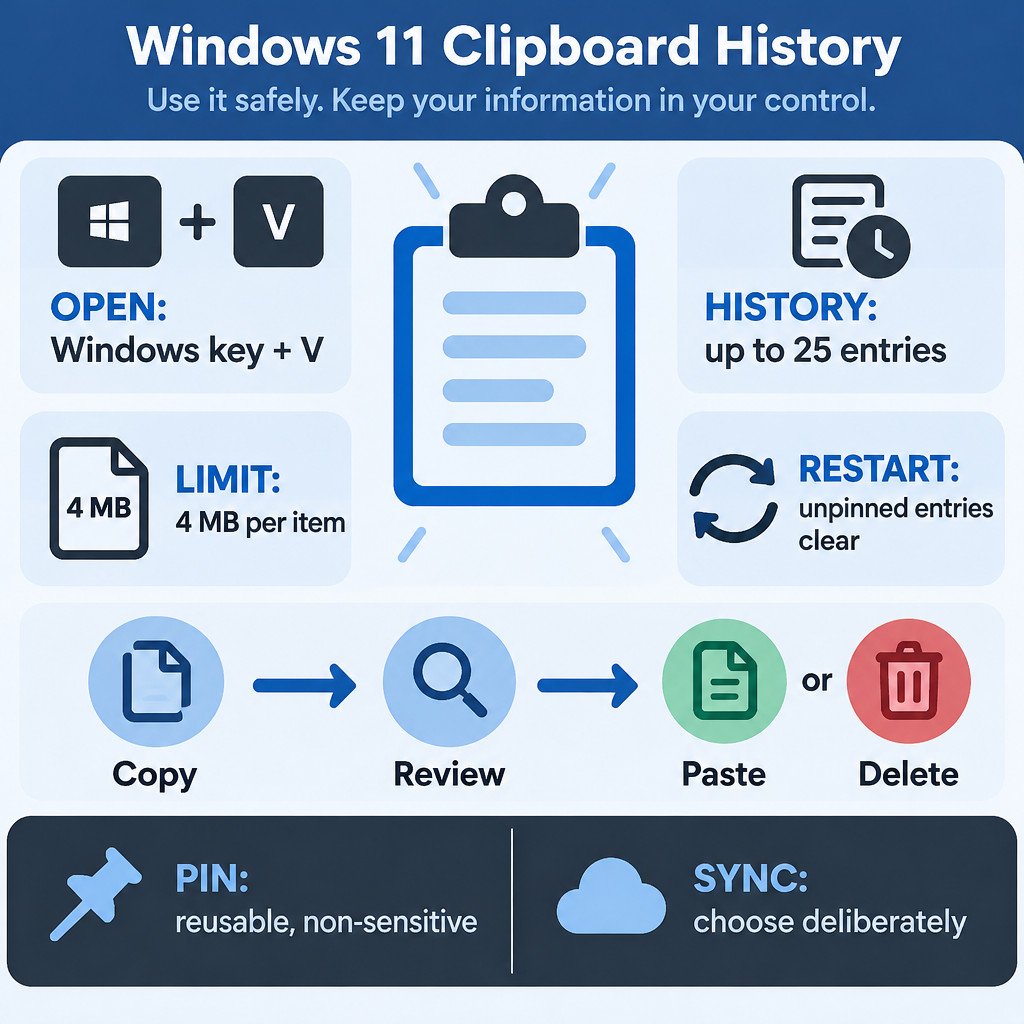
Press Windows key + V. If Clipboard History is off, select Turn on. You can also open Settings > System > Clipboard and enable Clipboard history there.
After it is enabled, copy several short items as usual with Ctrl + C. At a destination, press Windows key + V instead of Ctrl + V, then choose the item you want. Windows can store text, HTML, and bitmap images in the history panel. Microsoft documents the setup, supported content, and controls in its Clipboard guide.
- Use Ctrl + V when the most recently copied item is the right one.
- Use Windows key + V when you need something copied earlier.
- Pin an item only when you expect to reuse it and it is safe to retain.
A pinned item is a convenience feature, not a security boundary. Pin a neutral email sign-off or a project folder path if helpful. Do not pin a temporary access code just because you will need it again in a few minutes.
Know what stays and what goes
Clipboard History keeps up to 25 entries. As new items arrive, older unpinned items can be removed. Unpinned history is also cleared when you restart Windows, while pinned entries remain. Each stored item has a 4 MB size limit, so a large image or block of content may not appear in history even though it copied successfully.
These limits are useful guardrails, not a cleanup plan. If you copied sensitive material, remove it when you finish rather than relying on a restart or waiting for the history to fill.
Remove one item or clear the history
- Press Windows key + V.
- To remove one item, open its three-dot menu and choose the delete option.
- To remove the visible unpinned history in one action, choose Clear all in the history panel.
- Alternatively, go to Settings > System > Clipboard and use the clear clipboard-data control.
- Review pinned items separately and delete any that should no longer remain.
Clearing history preserves pinned items. That is convenient when you want to retain an approved template, but it is an easy detail to miss after copying something private. If sensitive text was pinned, remove that entry explicitly.
Decide whether cross-device sync is worth it
Windows can sync clipboard text between devices when you are signed in with the same supported Microsoft or work account. The Clipboard settings offer automatic syncing or a manual option that lets you choose which copied text to share. Automatic syncing is faster; manual syncing gives you a chance to decide item by item.
The tradeoff is straightforward: syncing makes a copied item available beyond the computer where you first copied it. Leave it off for passwords, passcodes, recovery keys, financial information, confidential work material, and any text you would not want to appear on another signed-in device. Microsoft identifies Cloud Clipboard as a connected Windows experience and describes its cross-device use in its connected experiences reference.
For example, an illustrative workflow might involve copying three meeting links and a standard project update from a work laptop. History on that laptop can save time. Syncing those items to a personal home PC is a separate decision, especially if the update contains names, schedules, or internal context.
Fix a missing or unavailable Clipboard History option
| What you see | What to check |
|---|---|
| Windows key + V does not show older items | Open Settings > System > Clipboard and confirm Clipboard history is enabled. Copy a small piece of plain text, then open the panel again. |
| The setting is greyed out or says it is managed | On a work or school PC, an organization may have disabled Clipboard History through policy. Contact the device administrator rather than trying to bypass the control. |
| An item does not appear in history | Try a smaller item. Clipboard History has a 4 MB per-item limit and supports text, HTML, and bitmap images. |
| Expected content disappeared after a restart | It was probably unpinned. Only pin content that is genuinely appropriate to keep. |
Managed-device restrictions are intentional in some organizations. Microsoft’s AllowClipboardHistory policy documentation explains that administrators can prevent clipboard contents from being stored in history, which can make the setting unavailable.
A quick safe-use checklist
- Use Clipboard History for ordinary work snippets that are useful for a short time.
- Press Windows key + V when you need an earlier copied item instead of copying it again.
- Pin sparingly, and only pin non-sensitive content you intentionally want to retain.
- Delete sensitive entries as soon as the task is complete; remember that Clear all does not remove pinned entries.
- Keep cross-device syncing disabled unless its convenience clearly outweighs the added exposure.
- On a managed PC, respect a disabled setting and ask IT if the feature is needed for a work process.
Clipboard History is most useful when treated as short-term working memory rather than long-term storage. That approach preserves the speed benefit without turning a convenient paste menu into a collection of information you meant to discard.
Sources
Microsoft Support documentation and Microsoft Learn policy documentation are linked alongside the relevant setup, limit, sync, and managed-device claims above.